Desserts
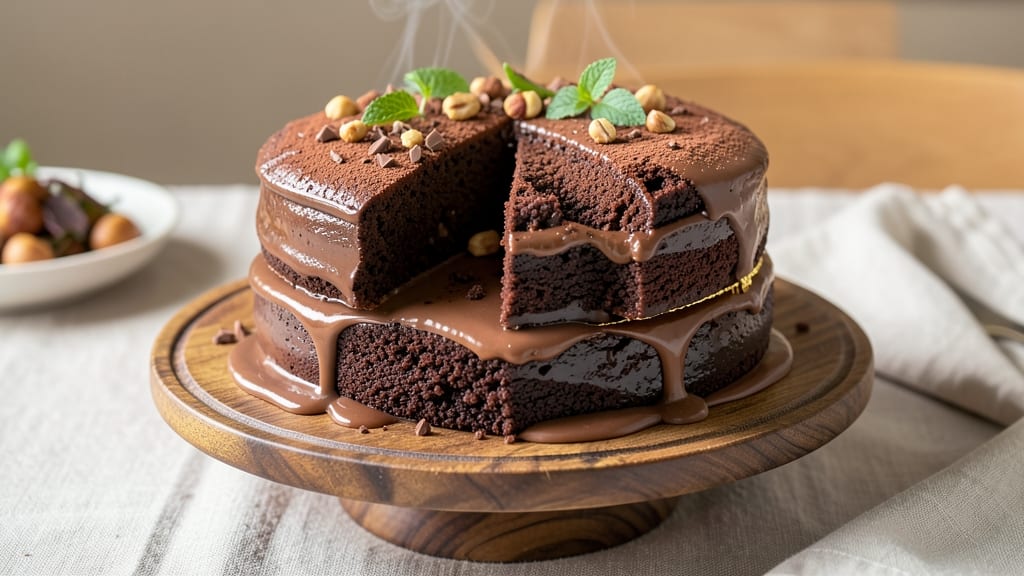
This baker's semi-sweet chocolate cake delivers the perfect balance of rich cocoa flavor and tender crumb—no dry layers or overly sweet aftertaste. I perfected this recipe after years of testing, ensuring every slice stays moist for days while maintaining that signature fudgy swirl.
The secret lies in precise ingredient ratios and a gentle baking technique that locks in moisture without sacrificing structure.
The classic creaming method forms the foundation, where butter and sugar emulsify to create a light, airy texture before cocoa powder and melted chocolate deepen the flavor. Gluten-free or vegan adaptations are possible without compromising quality—just swap the flour and butter for suitable substitutes.
This cake shines as a standalone dessert or elevated with whipped cream, chocolate ganache, or fresh berries.
What makes this recipe stand out is its reliability: no overmixing, no guesswork in baking times, and no need for multiple pans. The result is a cake with moist layers, a subtle caramelized crust, and just enough sweetness to satisfy chocolate lovers.
Perfect for birthdays, holidays, or an indulgent weekend treat, this recipe builds confidence in home bakers while delivering restaurant-quality results.
Whether you're a seasoned baker or just starting, this method ensures success every time. The instructions walk through each step clearly, from measuring ingredients to checking doneness, so you can focus on enjoying the process. Let's get started on a cake that will impress even the most discerning dessert lovers.
Ingredients for baker's semi sweet chocolate cake
Twelve ingredients, one pan, and a perfect balance of rich cocoa and tender crumb await.
| Ingredient | Amount | Notes |
|---|---|---|
| Unsalted Butter 🧈 | 1 cup | Room temperature, not melted |
| Granulated Sugar 🍚 | 1 ½ cups | Superfine preferred for smoother texture |
| Light Brown Sugar 🍚 | ½ cup | Packed firmly for accurate measurement |
| Large Eggs 🥚 | 2 whole | Room temperature for even baking |
| Unsweetened Cocoa Powder 🍫 | ½ cup | Dutch-processed for richer flavor |
| All-Purpose Flour 🌾 | 1 ½ cups | Sifted for lightest texture |
| Baking Powder 🍞 | 1 ½ tsp | Freshly measured for proper rise |
| Diamond Crystal Kosher Salt 🧂 | ½ tsp | Fine grain for even distribution |
| Vanilla Extract 🌿 | 1 tbsp | Pure Madagascar bourbon preferred |
| Semi-Sweet Chocolate Chips 🍫 | 1 cup | High-quality chocolate for fudgy swirls |
| Whole Milk 🥛 | ½ cup | Room temperature for smooth batter |
| Cornstarch 🌾 | 1 tbsp | For tender crumb and moisture retention |
The cocoa powder and chocolate chips are non-negotiable for authentic flavor—Valrhona or Guittard brands deliver the depth you need. For the butter, Plugrá or Land O'Lakes unsalted work beautifully, but avoid salted varieties that disrupt the delicate balance. The semi-sweet chocolate chips should be at least 50% cocoa for that signature fudgy swirl. If you're using a different brand, check the cocoa percentage—Ghirardelli or Lindt are excellent choices. For the flour, King Arthur or Gold Medal are reliable for consistent results, but sift it thoroughly to prevent dense layers.
No cocoa powder? Melted dark chocolate at double the amount works in a pinch, though the texture will differ slightly. Swapping superfine sugar for regular? Pulse it in a food processor first to mimic the texture. The baking powder must be fresh—test it annually by mixing with water to see if it bubbles. For a gluten-free adaptation, King Arthur gluten-free flour blend replaces all-purpose flour one-to-one, though the texture will be slightly denser. The vanilla extract can be omitted if needed, but the flavor profile will be noticeably less complex.
Store the cake in an airtight container at room temperature for up to 3 days, or refrigerate for 5 days if you prefer longer storage. For maximum moisture retention, wrap tightly in plastic wrap before sealing the container. This cake reheats beautifully—30 seconds in the microwave restores freshness. To prevent drying, slice only what you need and store the rest properly. The batter can be prepared 24 hours ahead and refrigerated, saving you time on baking day.
Why You'll Love This Recipe
- No Mixer Needed: I swear by this recipe because it’s the only chocolate cake I make that doesn’t require a stand mixer—just a bowl and a sturdy spoon. The brown sugar and butter get creamed by hand in minutes, and the cocoa powder dissolves like a dream. (Yes, even on a Tuesday night.)
- Rich Without Overpowering: Here’s what sold me—the balance. The semi-sweet cocoa and brown sugar give it depth, but the eggs keep it from tasting bitter. That first moist, fudgy bite? It’s the kind of flavor that makes you pause mid-slice.
- Birthday or Boredom: Between us, this cake is my go-to for anything—birthday celebrations, last-minute dessert cravings, or when I just want to impress someone with zero effort. Frost it, serve it plain, or stack it with whipped cream. It’s that adaptable.
- Budget-Friendly Luxury: I make this at least once a month because it’s cheap but feels special. A block of butter, a bag of sugar, and a handful of eggs stretch farther than you’d think. Plus, leftovers? They last days if you refrigerate them right—trust me, they’ll still taste amazing.
Step-by-step instructions for baker's semi-sweet chocolate cake
Master this one-pan technique for layers of moisture and rich chocolate swirls every time.
Cream Butter and Sugars to Lighten the Mixture
In a stand mixer fitted with the paddle attachment, beat the 1 cup unsalted butter with the 1.5 cups granulated sugar and 0.5 cup light brown sugar on medium speed for 3-4 minutes. You're looking for a pale, fluffy texture that nearly doubles in volume—the mixture should look like ribbons when you lift the paddle. This creaming process incorporates air, which creates that tender crumb we're after.
I press down on the butter with a spatula during the first minute to ensure even distribution of the sugars. If you're using room-temperature ingredients, this step should take about 3 minutes total. The butter should be completely smooth with no graininess remaining. This is the foundation for that signature moist texture—don't rush it.
Incorporate Eggs and Cocoa for Rich Chocolate Flavor
Add the 2 whole large eggs, one at a time, mixing on low speed for 30 seconds after each addition until fully incorporated. Then add the 1 tbsp vanilla extract and mix for another 10 seconds. The mixture will look slightly curdled, but that's normal—the cocoa powder will smooth everything out.
Next, whisk together the 1.5 cups all-purpose flour, 1.5 tsp baking powder, 0.5 tsp diamond crystal kosher salt, and 1 tbsp cornstarch in a separate bowl. Sift the dry ingredients directly into the wet mixture while mixing on low speed. The batter should come together smoothly with just a few flour streaks remaining. Overmixing develops gluten, which can make the cake dense, so stop as soon as everything is combined.
Fold in Chocolate Chips and Milk for Swirls
Remove the mixer bowl and gently fold in the 1 cup semi-sweet chocolate chips using a silicone spatula. Then stir in the 0.5 cup whole milk until just combined. The batter should be thick but pourable—if it's too stiff, add an additional 1 tablespoon of milk. This is where we create those signature fudgy swirls that make this cake special.
For the best swirl effect, I recommend using a large offset spatula to spread the batter in the prepared pan, then immediately drop spoonfuls of the chocolate chip mixture on top before swirling gently with the spatula. This creates marbled patterns that translate beautifully into each slice.
Bake Until Golden and Springy
Preheat your oven to 350°F and grease a 9-inch round cake pan thoroughly with butter or baking spray. Pour the batter into the prepared pan and smooth the top with a spatula. Bake for 30-35 minutes, until a toothpick inserted in the center comes out clean and the edges are golden brown.
The cake is done when it springs back gently when pressed in the center—this ensures it's fully set but still moist. I like to tent the pan with foil during the last 10 minutes of baking if the top is browning too quickly. Let the cake cool in the pan for 10 minutes, then transfer to a wire rack to cool completely before slicing.
Achieve Perfect Moisture with Resting Time
While the cake cools, I recommend brushing the warm layers with a simple syrup made from 2 tablespoons granulated sugar and 2 tablespoons hot water. This step is optional but enhances the moisture—just brush it on gently after the cake has cooled for 30 minutes. The cake will keep well at room temperature for 3 days, covered tightly.
For serving, slice into 8 equal wedges using a sharp serrated knife. Each piece should reveal those beautiful chocolate swirls throughout the moist crumb. The texture should be tender with a slight give in the center, not dry or cakey. This is the hallmark of a properly baked semi-sweet chocolate cake.
Pro Tips For Making Baker'S Semi Sweet Chocolate Cake
- Melt Butter Slowly: I learned this the hard way—dumping cold butter into hot sugar makes a greasy mess that won’t dissolve properly. Warm the butter in the microwave for 20-30 seconds first, then mix it with the sugars. The butter will blend smoothly, and your cake will have that rich, velvety texture instead of looking like it’s fighting for its life.
- Sift That Cocoa: Unsweetened cocoa powder is finicky—it clumps like a grumpy cat if you don’t treat it right. Sift it with the flour (if using) and a pinch of salt before adding to the dry ingredients. This keeps the texture light and prevents those dreaded dense patches in your cake.
- Don’t Overmix the Batter: I used to beat this batter until it looked like it could stand on its own. Wrong move. Once you fold in the eggs and melted butter, mix just until combined—about 15-20 strokes. Overmixing makes the cake tough and chewy, and nobody wants that with a semi-sweet chocolate cake.
- Test for Doneness Early: This cake’s dark color tricks you into thinking it’s done before it is. Insert a toothpick at the center—if it comes out with a few moist crumbs but no wet batter, it’s ready. Pull it out a minute early if you’re nervous; the residual heat will finish the job without turning it into a brick.
Common mistakes when making this dish
Overmixing the Batter
I’ve seen countless cakes turn dense and rubbery because the batter was overmixed after adding the dry ingredients. Once you fold in the flour, baking powder, and cornstarch, stop mixing as soon as the batter comes together—just a few streaks of flour should remain.
Overmixing develops gluten in the flour, which creates a tough, cakey texture instead of the tender crumb we want. If your batter looks smooth but still thick, fold it gently by hand rather than relying on the mixer. 💡
Incorrect Butter Temperature
Room-temperature butter is non-negotiable for this recipe. If your butter is too cold, it won’t cream properly with the sugars, leading to a greasy, uneven texture. If it’s too soft or melted, the cake may spread excessively in the pan or collapse.
To test, press a thumb into the butter—it should leave a slight indent but hold its shape. If unsure, chill melted butter for 10 minutes before using. I keep my butter in the fridge until just before mixing, then let it sit on the counter for 30-60 minutes. ❄️
Skipping the Resting Time
Rushing to slice the cake immediately after baking is a common mistake that results in dry, crumbly layers. The cake needs time to set and redistribute its moisture.
Let it cool in the pan for 10 minutes, then transfer to a wire rack to cool completely (at least 1 hour). This resting period allows the internal structure to stabilize, ensuring each slice stays moist.
If you’re impatient, cover the cake loosely with plastic wrap while it cools to retain moisture. 🕒
Using Old or Improperly Measured Ingredients
Freshness matters, especially with baking powder and cocoa powder. Old baking powder loses its leavening power, causing the cake to sink in the center. Test yours by mixing 1 teaspoon with ¼ cup hot water—it should bubble vigorously.
For cocoa powder, use Dutch-processed (like Valrhona or Hershey’s Special Dark) for richer flavor and smoother texture. When measuring flour, spoon it into the cup and level it off—don’t scoop directly from the bag, or you’ll pack it too tightly, altering the recipe’s balance. 🌾
Overbaking for a "Drier" Cake
Chocolate cakes are naturally moist, but many bakers overcompensate by baking until the toothpick comes out completely clean. The ideal test is a moist crumb clinging to the toothpick with no wet batter. Overbaking dries out the cake and creates a tough crust.
If your oven runs hot, reduce the temperature by 25°F and check for doneness 5 minutes early. A cake that springs back gently when pressed in the center is perfect. 🍫
Ignoring Pan Preparation
A poorly greased or floured pan can cause the cake to stick or develop a raw bottom. Grease the 9-inch round pan thoroughly with butter or baking spray, then dust it lightly with flour, tapping out the excess. For extra insurance, line the bottom with parchment paper.
If you’re using a dark-colored pan, reduce the oven temperature by 10°F to prevent over-browning. I also recommend baking the cake on the middle rack for even heat distribution. 🧈
Nutrition facts
Frequently asked questions
Why does this recipe call for both cocoa powder and chocolate chips?
The cocoa powder provides deep chocolate flavor and structure, while the chocolate chips create those signature fudgy swirls throughout each slice. The combination delivers both rich taste and visual appeal. For a smoother texture, use high-quality chips like Ghirardelli or Lindt with at least 50% cocoa content.
Can I make this cake gluten-free or vegan?
Yes! For gluten-free, substitute 1.5 cups all-purpose flour with King Arthur gluten-free flour blend (1:1 ratio). The texture will be slightly denser but still moist. For vegan, replace the butter with vegan butter or coconut oil, use flax eggs (1 tbsp ground flax + 3 tbsp water per egg), and swap milk for almond or oat milk. The cake may need 2-3 extra minutes in the oven.
How do I prevent my cake from cracking on top?
Cracking often happens from rapid oven temperature changes or overbaking. To avoid it: 1) Preheat your oven fully for 20 minutes before baking. 2) Tent the cake with foil if the top browns too quickly in the first 15 minutes. 3) Don’t open the oven door during baking. The cake should be done when a toothpick comes out with moist crumbs, not completely clean.
What’s the best way to store leftovers?
Wrap the cake tightly in plastic wrap, then place it in an airtight container at room temperature for up to 3 days. For longer storage (5 days), refrigerate. To revive slices, warm them in the microwave for 10-15 seconds or at 300°F for 5 minutes. Freezing isn’t recommended as it can make the texture dry.
Can I use this recipe for a layer cake?
This recipe is designed as a single-layer cake, but you can easily adapt it for layers. Divide the batter evenly between two 8-inch round pans and bake for 25-30 minutes each. For a 3-layer cake, reduce each pan size to 6 inches and bake for 20-25 minutes. Let layers cool completely before assembling with frosting or filling.